The Spring Trunk Sale happens on Sunday, April 26th, from 10 to 4pm at the Chocolate Claim. Local artists and designers will show up with a trunk full of handmade, creative works you will love. This is part one of a series of interviews from the Trunk Sale vendors.
Describe your medium – what will you show up with in your trunk?
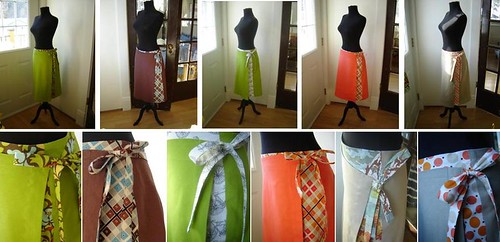
I sew lots of stuff – bags, totes, purses, aprons, baby clothes and accessories, skirts and I’ve done a few wedding dresses – no bridezillas though! My trunk will have a variety of cotton and linen sewn goods, including belts, wrap skirts, wristlets, small clasp purses, hankies (remember those?) and possibly some up-cycled women’s p.j. pants made from vintage sheets – time permitting!
What do you enjoy about sewing?
Seeing the final product. In fact, I’m very guilty of sewing along like a maniac without checking my work, only to discover I’ve sewn something upside down or backwards. I also really enjoying giving what I make away – I have really appreciative friends and family.
Do you have a favorite tip or skill that’s made things work better for you?
I have a few tools that are handy – a pair of tailor’s scissors on an elastic around my neck at all times, a ruler along the front edge of my sewing table for quick and easy measuring, a 20 pound roll of 36” tracing paper for pattern making…
What do you listen to while making?
Unfortunately the hum of my industrial sewing machine is fairly good at drowning out Jian Ghomeshi. so often I listen to myself thinking - and cursing once in a while.
What are your favourite colours right now?
Brown and aqua.
Where else and when else can we find your work?
At Christmas time I’m easiest to find at the Littlest Art and Craft Fair and the Fireweed Community Market Society Christmas Sale. I have some canvas buckets at Knit Now on 3rd Avenue and sell out of my home downtown. The Spring Trunk Sale is a great non-Christmas opportunity to offer my sewn goods to the public.
Favourite blog/website: makesomething.ca

Tracking my crafting and sewing adventures...
Thursday, April 9, 2009
Wednesday, April 8, 2009
Sunday, April 5, 2009
Anna's Belt
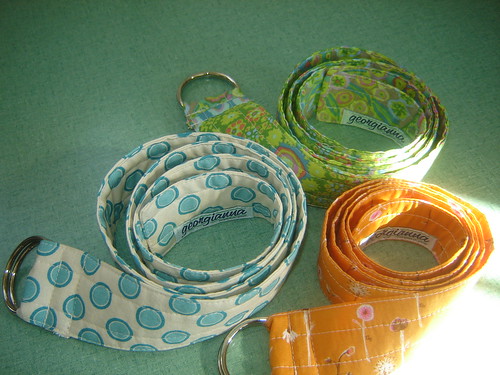 My sister in law (that's fun to say, she's my first and only sister!) came back from holidays in Winnipeg last year with the cutest fabric belt. I've finally managed to find D-rings and try making some of my own Anna Belts. They're really nice, another great way to wear fun fabric patterns - a quest I'm always on. I just made one for our good friend DH for his birthday with faux bois fabric (I'll have to get a photo!). I'm making a bunch for the Spring Trunk Show which will now be on April 26th at the Chocolate Claim from 10am to 4pm - hope you can come!
I'll try to paraphrase how I made these - I did experiment with different widths until I got it right. Another thing to be aware of, if you're buying D-rings online (i.e. sight unseen), just wait 'til they arrive before cutting fabric! Different companies measure D-rings differently, some from the outside of the ring, and some from the inside. So here is my first mini-tutorial:
1. Fabric: Measure the inside of the D-ring, multiply this by 2 and add 1/2 an inch. That is the width of your strip of fabric when using 1/4 inch seam allowance, the length could be 45 to 48 inches, your choice. My D-ring was 1 3/4 inches, my fabric strip therefore was 4 inches.
2. Interfacing: Cut a piece of fusible interfacing - use the fusible fleece interfacing, a fairly stiff/thick interfacing that irons on. The width of mine was 1 and 5/8 inches; roughly an 1/8 inch narrower than the finished belt width. Cut it the same length as the belt fabric.
3. Ironing: Iron the fabric in half, lengthwise, wrong sides together. Open this fold and press a 1/2" hem at one end. Align the fusible interfacing, fusible side down along the crease lines at the end and along the length. Fold over the fabric, making a sandwich and press. Open up and press the long edge hem over the non-fusible side of the interfacing, should be a healthy 1/4 inch. Flip belt over and press the other long edge over the whole belt, then open up the belt and tuck the hem in and press one more time. (ok, sorry, I really should have some photos shouldn't I?!).
4. Sew across the hemmed edges starting at the belt end, turn and go down the long edge. Choose a matching thread colour if possible. The other end of the belt is raw edges.
5. Sew topstitching lines down the length of the belt 1/2 inch in from the edges or at whichever intervals you choose, I suppose you could even sew abstract wiggle lines up and down the belt... I'll have to try that!
6. Serge (or zig zag) the raw end of the belt, turn under 1/4 inch, thread D-rings and sew in D-rings, maybe with a 3/4 or 1 inch over lap of belt fabric. I try to sew as close to the D-rings as possible and then a second seam along the tab end so it doesn't stick up too much.
Finished!
Disclaimer - those width measurements may or may not work for you, I'm not a precision sewer like most quilter sewers out there are! And now that you've waded your way through that, here is a good tutorial for a similar belt.
Subscribe to:
Posts (Atom)